Travel Blogging (The Definitive Guide for 2022)
Let me tell you, walking through the road of travel blogging is not as easy as it shows.
It is a hard decision that was made at some point of time. Yes … it was when this blog was created as well.
Traveling is all about joyful experiences, leaning new things and getting to know people as well as cultures. It is just the life adventures that most people look forward to have.
This post is made to be your FULL guide about starting your passion and work as travel blogger, and even make money from it. The post will be always updated with new stuff that could be useful and important to know.
By the end of this epic guide, you will have all the required information along with things you need to do in order to start your journey with travel blogging.
Step 1: Choose a Name for Your Blog

I specifically mean, a domain name (i.e., your website name).
It might take hours of brainstorming to find suitable one, and this is step is really the most challenging one of starting a travel blog.
Why you should give it that attention?
Because simple, you are planning to grow.
This means, that name will represent you later if you intend to work with brands, travel companies or even if it is only for your followers.
So, you have to be sure to make the right decision. To make that easier on you, just keep those points in mind:
Choose short, lasting and easy-to-remember domain name:
It is always preferable to use short names. It is faster to type and reach.
Also, take in consideration to make it memorable and related to the content you intend to share on your blog.
The name should be also something that you know you won’t need to change in the future. Changing domain names might make you lose huge amount of your followers/traffic later.
A nice tool that can help you making a brainstorming is DomainWheel.com. Type any word you want, for example: Travel, like here:

Here are the results I got as suggestions for domain name:

Your can even choose to get results only for .com names by unchecking other options. And when you click “Search Domain” again, you will get only .com available domains:

This is what will take us to the next point.
Check if the .com domain name is still available:
Picking up a domain with .com is NOT something that you must do. But it is also preferable since it is more global.
Choose a name that describes you – as possible:
You want people to say: this name really matches what the content you offer.
Make it creative and elegant:
Needless to say, that the web is full with traditional names. So, try to be creative.
Stay away from copying others’ names. Nobody will remember “Nomadic Adam” when “Nomadic Matt” is that much widespread, right? ?
Just try to avoid words like: “nomadic,” “wanderlust,” “vagabond,” “adventure”, “Adventurous”, “Backpacking”, and “wandering.”
The same way, avoid name that doesn’t feel right. If you intend to work with known companies, or take tour trips, you don’t want your name to be like: themodernsexytraverler.com.
It won’t be attractive or professional for any company or individuals to work with.
Avoid dating, numbers and hyphens:
In general, you have to use with 3-4 words maximum. But even if you have like 3 words in the name, try to find the good composition in order to avoid using any extra hyphens or numbers in between.
Because using hyphens, numbers or even dating (for example, your age) will make your domain name looks boring and hard to remember. It will be even hard to tell it to someone without explaining why did you chose that name.
Since you are supposed to be traveling and meeting new people all the time, this name would be a kind of self marketing of you. So, choose it wisely.
Check out the availability of the name on social media before buying:
Social media is essential for every work.
Make sure that the name you have choose as domain name is also available on all social media networks that you are interested in.
However, it is not big deal if the name is not available there. You may consider modifying it.
A website like: WeTravelTheWorld.com can be modified to be WTTWorld, or something like that.
Full disclosure: This blog post contains affiliate links. If you decide to purchase through one of these links, we receive a commission from the sale at no additional cost to you. If you have any questions about the companies or my status as an affiliate, please don’t hesitate to email us.
Step 2: Choose a Hosting for Your Blog
So, after you’ve picked out a good domain name, you’ll have to register it and get a hosting.
Hosting is the space you rent on the internet where you can store all your website’s data, files, and photos so that people around the world can easily access it when they type in your domain name.
There are so many hosting companies out there. Our recommendation goes always to the hosting giant Bluehost.
Why to choose Bluehost?
Alright, I made this review about Bluehost for you. I talked (in details) about this hosting giant and why we think it is the best for any kind of blogging, specially travel blogging.
Bluehost has awesome support 24/7, and has very good user-friendly UI (User Interface).
In additional to that, they were officially recommended by WordPress since 2005. I will tell you why this important later in this article.
But the best part about Bluehost is that they offer quality shared hosting for a very low price (you can get started for as little as $3.95 a month through this link).
And … another bonus: you’ll receive your domain name for free!
Next, I will guide you step-by-step to set your hosting up. It super easy. This won’t take more than few minutes ?
Step 3: Register your domain and hosting with Bluehost
In order to get your domain and hosting registered and ready, follow these steps.

Go to Bluehost’s homepage. This is what you’ll see:

The first step you need to do here is to change the currency to your local one or whatever you would like to pay with.
Next, click on the green button that says “Get Started”:

After that, you’ll be redirected to the Bluehost hosting plans page, which should look like this:
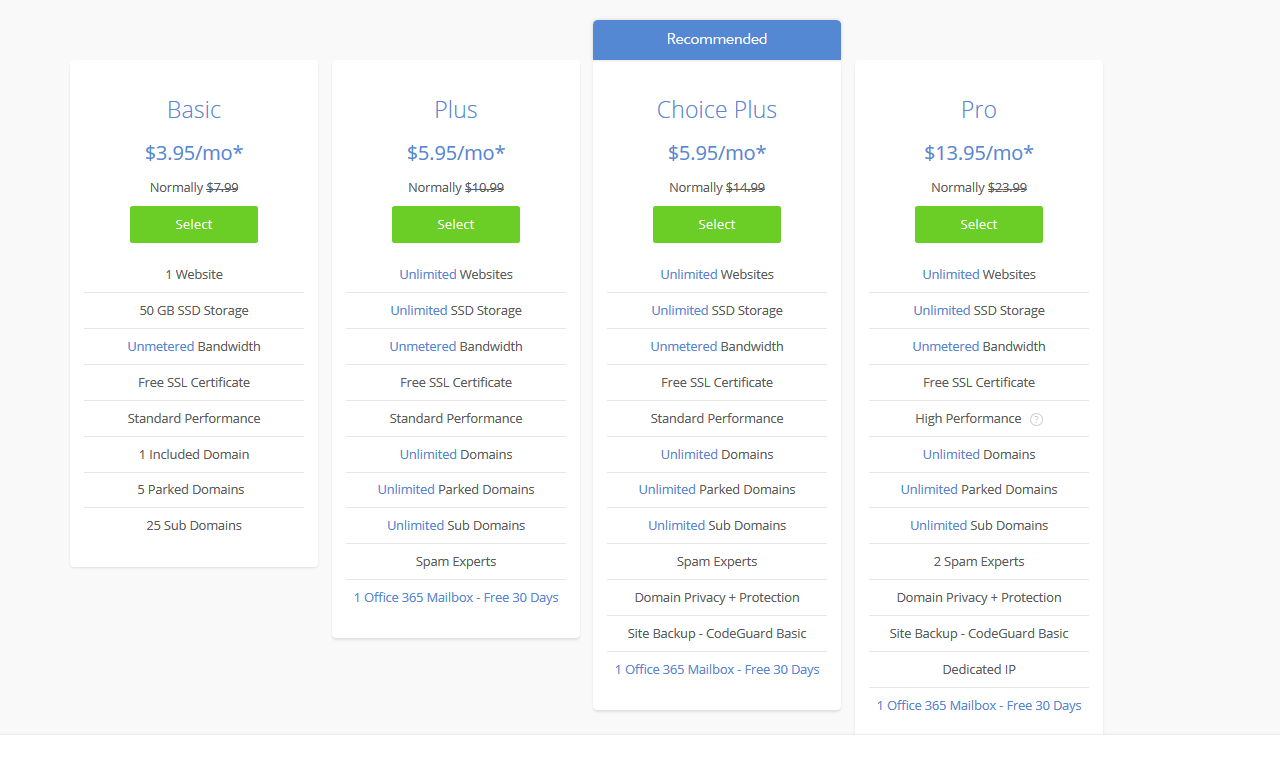
I wouldn’t recommend spending more money on hosting plans until you get bigger amount of traffic.
Since you are still new and building your blog from scratch, the cheapest option which is the BASIC plan, for $3.95 per month would be totally enough. You can always upgrade your hosting at any time when your blog starts to get more visitors.
If you already have a domain, select the “I have a domain name” option. Or, if you haven’t purchased your domain name yet, you have to sign it up here:

It is so common that people register a domain name with a spelling mistake in it. So, remember to check the domain name multiple times for spelling errors before clicking on Next!
As an example, I selected the domain name: dreamytravelling.com. If your domain is still available, Bluehost will tell you in a message like this:

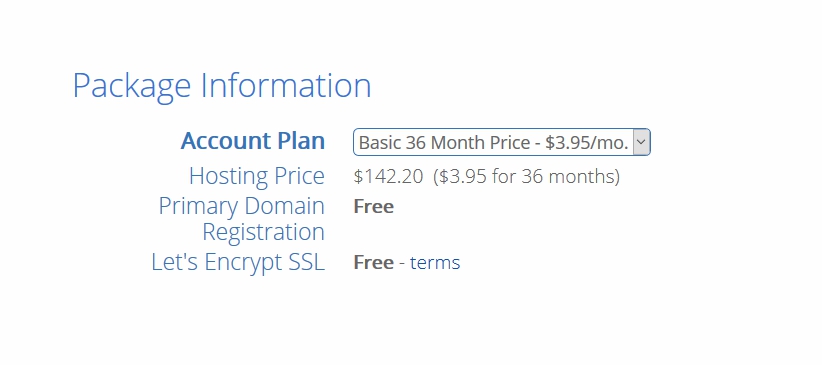
On the next screen, Input everything that Bluehost is asking for here, and then your package information. And then scroll down.

The next step is to add extra features if you want to.
The only tool I would recommend here is Domain Privacy Protection.
The reason for that is because anyone can look up who owns your site and see your information will be on public record, if you didn’t have it. It costs only $0.99 per month.
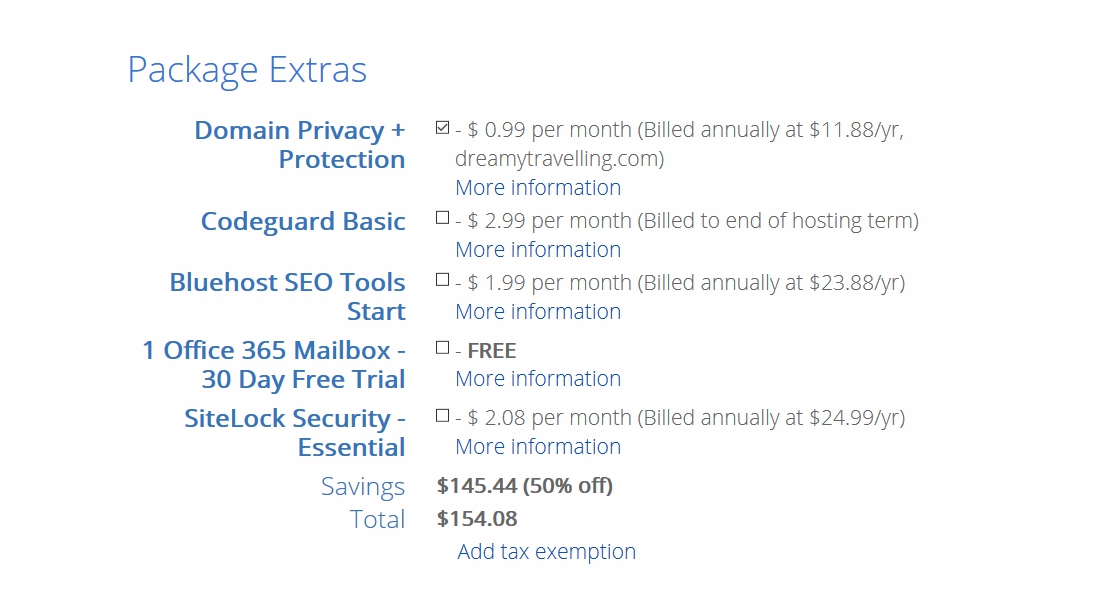
Tip: You might have been noticed, that the longer you buy your hosting for, the cheaper it is.
For example, if you select three years of hosting, your domain will only cost $145.44 USD as it shows here:
It is recommended to do that.
Why? Is it just because it’s cheap?
Well … not really.
No doubt, the marginal price when choosing more years is small. And if you look what you will get from this, you see that you are saving 50% of the original cost, plus you don’t have to worry about renewing for a long time.
But this is not the only reason why you want to take 3 years package. Here is one more important reason.
One of the SEO factors that google considers for better ranking on its search pages is domain age.
In his video titled “How does Google determine domain age, and is it important for ranking?”, Google’s Matt Cutts states that:
“The difference between a domain that’s six months old versus one year old is really not that big at all.”
Finally, fill in your payment information.
Bluehost has 2 options to pay. You can pay either with credit card or PayPal.
After you finish that part, you have to accept the terms of service of course, then you’re good to go!
Congrats! You’ve now set up your hosting and domain name — easy, right?
Step 4: Install WordPress

Now that you’ve registered your domain name and chosen your hosting package, it’s time to install WordPress.
WordPress is an open-source and free web publishing application, content management system (CMS) and blogging tool. It is the CMS that used by most professional websites like the New York Times, BBC, Time and so many others.
WordPress is actually the best CMS that cab be suggested for travel blogging. It is super easy, fast and user-friendly.
Installing WordPress with your Bluehost Account is super easy — because it can be done automatically with one click. ?
After you’ve paid, you’ll be asked to choose your password for WordPress. After that, you will be able to start building your new blog.
Step 5: Learning WordPress
There are TONS of options out there to learn WordPress.
That includes really lot of amazing tutorial and videos that will teach you about anything you need for travel blogging.
Here is my recommended list for free resources to learning WordPress:
- WordPress Lessons
- WordPress TV
- WPBeginner
- Linkedin Learning
- Udemy
- Blue Flash: If you become a Bluehost customer, ask customer support about Blue Flash. It is their own free tutorials about WordPress.
Step 6: Finding a Theme
We have come to the most interesting part! It is about making your travel blogging website looks great.
Your new WordPress blog offers you default themes. However, they are not so professional or even nice (Sorry WordPress, but it is just an opinion).
Elegant and professional blog themes cost between $30 – $50, and they’ll make the look and functionality of your blog much better.
Of course, there are also so many free of them, and they are still great option as it allows you to keep costs low. But if you plan on going on with travel blogging as your coming career, this might become a problem as your travel blog grows. That’s why we would recommend having a premium theme.
Here are the top rating places for finding awesome themes:
ThemeForest:
ThemeForest currently has the largest library of WordPress themes with over 11,000 premium ones.
There are many nice travel blogging related templates and WordPress themes to choose from as well:

If you want to see only WordPress templates, you have to click on WordPress on the left side.
The price ranges from as low as $30 to as high as $60 per theme, but the themes available have hundreds of functions, customization options, great designs and have a support team to solve your queries within a few hours.
Elegant Themes:
It is just another great WordPress theme shop to get really beautiful and professional-looking themes.
For $89 a year, you’ll gain access to 87 amazing WordPress themes, or an impressive one-time fee of $249 if you want “Lifetime Access” to everything Elegant Themes has to offer.
In fact, it’s great value for money. Plus, you will get 30-day money-back guarantee on all purchases.
Elegant Themes is highly recommended by some of the top WordPress enthusiasts and experts, specially for travel blogging related websites. We would also give our vote to it.
Most themes include installation instructions. So, installation phase should not be a problem. You can find tutorial about doing that on YouTube or WordPress learning websites we’ve mentioned above.
Once you’ve paid for the chosen theme, you will get the downloadable theme file which you can upload and activate on your travel blog.
You can check out our collections for best selling WordPress themes for travel blogs. We always update that post with the best available WordPress themes in the market.
Step 7: Installing WordPress Essential Plugins
Another part of installing WordPress, is actually installing WordPress plugins.
They are apps that allow you to add new features and functionality to your WordPress website. These will offer you more benefits, as well as save your time. To start, head to your main WordPress dashboard –> Plugins –> Add New.

When you click on “add new”, you will be moved to another page where you can make a search and find the plugins you want.
Here’s our recommended list of must-have plugins to install with your travel blog:
Akismet:
You will be surprised of the amount of spammy comments you might get until you install this plugin. Akismet tries to reduce the amount of those comments and protects you by applying specific filters. Not perfect, but it is still very good.
This plugin comes installed with WordPress. You only need to sign up for an account at akismet.com, then follow the steps to activate it.
Yoast SEO:
Talking about SEO again, this plugin is literally the best one.
Yoast SEO helps you to improve your rankings in Google easily. If you want to get decent number of monthly visitors to your travel blog, you MUST know something about SEO.
Of course, it is NOT everything you need to have if you want to rank better in Google. But it is your first step.
The free version comes with many features. You will be able to add meta tags, meta descriptions, customize how your post titles will appear on Google search pages and much more.
BackWPup:
As your travel blog grows, it is crucial to have a backup policy in place to keep all your data secure.
In fact, backing up a WordPress site won’t be difficult thing if you are using this plugin.
BackWPup is easy to use. It offers you the ability to schedule backups according to your site’s update frequency. You can store the backups then on the external services like Dropbox, Amazon S3, Rackspace, email, or even your computer.
MashShare:
This plugin is made to let you add Mashable type attractive share buttons to your website.
MashShare display all popular social sharing buttons with count, such as Twitter, Facebook, LinkedIn, Google plus and many more.
The best part about it is the fact of using smart caching. This means it doesn’t slow down your site.
Comments Not Replied To:
WordPress post comments are great way to interact with your readers and let them know that you are there and reply them.
This is very important for your travel blog authenticity.
It should be no problem to you to reply the few comments you will get as your website is still new. But once you started to get hundred (or more) comment per month, this won’t be easy to manage and can become very time consuming.
So, you definitely need a plugin to manage that.
This plugin will show you the comments which are yet to receive a reply. You will be able to reply them all in shorter time and in one place. This means you won’t need to search for them individually.
It is free-to-use plugin and easy to install.
However, there are more important WordPress plugins for travel blogs that you might find useful.
Step 8: Create Your Social Media Channels
Here is a fact: 50% of the travel blogging success these days comes from your social media channels.
If you want to create a successful and profitable travel blog, being existed on social media is essential.
After you’ve chosen a name for your travel blog and registered your domain name, you should move and create your social media channels as well.
However, learning how to master social media is a big topic that we will be covering soon. Get notified about our upcoming posts, offers, freebies and more by subscribing to our email list.
Important thing to keep in mind when you create your social media accounts is to keep the usernames the same on all of them if possible. You don’t want to make people confused.
It is also not recommended to build your social media (specially Facebook or Instagram) before you already have a travel website with some articles on it. Social media is important for your upcoming business, but those platforms are not owned by you – like your website. They could just disappear or removed somehow.
Step 9: Create Your 4 Important Pages
WordPress offers you the ability to make pages on your website and not only posts.
What is the difference.
Well, best answers we found about that were in Quora.
Robert Charles Lee, said:
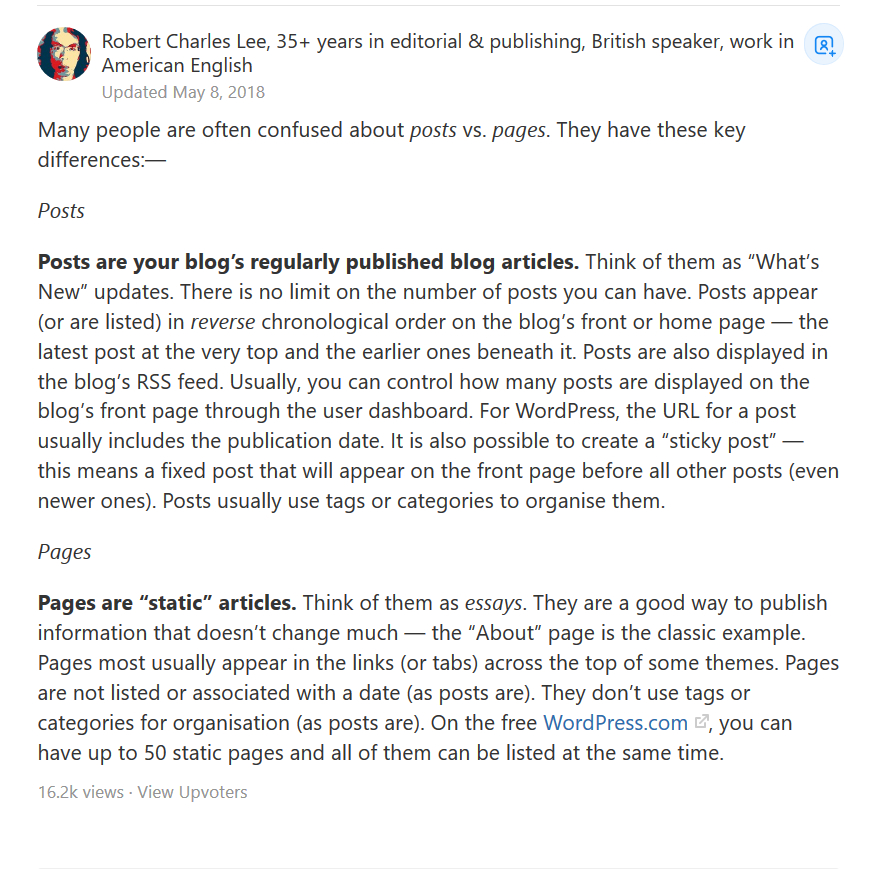
While Pritty Mary Varghese, a Senior Developer at Veeble SoftTech, said:

To create these pages, go to the left sidebar in WordPress dashboard and click Pages —> Add New. The same for creating posts, go to the left sidebar in WordPress dashboard and click Posts –> Add New.
The following page are main ones that any travel blogging website (or just any other website) should have:
About page:
You should create an about page before you even write your first post. People like to know who is the person behind a travel blog. Tell them something about you, what you did in life and how your travel blog will help them.
Contact Page:
Give your followers the chance to get in touch with you! Tell then some information about what they can ask and how can you help.
Privacy Page:
This page is one of the most important legal agreements. You should make it to let people know about third-party services you may use (like Google Analytics). You need also to tell them if you use cookies.
Copyright Page:
It is optional to make it or not. It is made to tell people that you own the work you are doing on your website and it is not taken (or stolen) from anyone.
To know more about these pages, just check other travel blogs and see how did they do it.
Step 10: Join a Travel Blogging Course
Joining a travel blogging course is completely optional step.
If you already have the knowledge you need to build your own blog, then you don’t need to follow any course. But if you don’t, this kind of course will shorten the way and make it easier for you to start.
For example, Matt Kepnes (also known as Nomadic Matt) has made a very detailed and informative travel blogging course which was built on his long experience (10 years) of both blogging and traveling.
This course has helped so many travel bloggers and inspired them.

It is the really recommend to join and use every single tip you will learn in your next steps.
If you’re interested, click here to learn more and get started!
Step 11: Create Awesome Content
After you took a comprehensive blogging course, you will be ready to make amazing travel content.
You might wonder: what if I am not traveling now?
No problem.
You can start by creating your list of travel plans, and make a strategy on how to achieve them. Moreover, how about focusing on what you know?
Here is the very good strategy to do:
If you’re a photographer, make awesome photos, and explain people how you made them.
Same for videos, if you are Videographer, make nice videos for the city you live in, or any nearby cities maybe and make sure to have a YouTube page where you can upload them then also share on your own travel bog.
If you writing skills are great, write about the best travel experiences you’ve had. Don’t be shy or afraid to show your personality. Let it shine through.
Step 12: Install Google Analytics:

Google Analytics is a MUST for any website.
It’s a useful and important tool for every website owner that allow them to track the traffic and get lot of detailed information about the site visitors.
But why is it so important?
Here’s top five reason why you need Google Analytics:
– It allows you to see how visitors find your website:
Your travel blog is one among more than one billion websites on internet. All of them want to be found for sure.
Google Analytics has a section titled: Acquisition. It is where you can find out what online way your visitors are coming from (how they found your website.)
– It allows you to track your traffic and discover more about your visitors:
For example, which Geographical area brings in the most readers.
– It allows you to know what pages / posts are the most popular on your site:
You want to take a look at this info every week. Here you can find out which posts are getting traffic and whether it’s more or less over time. This helps you to know what your visitors like the most and how can you improve your content.
– It allows you to track conversions:
Conversions are great way to know if your visitors are finding what they’re looking for on your website or not.
If you have something to sell, you need to know if they are reaching it and able to complete the purchase process. Same for tasks like filling out a form, or signing up for newsletters. Google Analytics will help you in that.
– It allows you to understand which social media platform is the best to target:
Social media is a great way get more followers/visitors to your website.
If you consider using paid ads later, Google Analytics will be the best tool to help you figure out which social media account is the most active.
Let’s say if you noticed that you are getting higher engagement on Facebook than Instagram, then you need to place your advertising campaigns on Facebook. You would know that it will get you better results.
To get started, check out this detailed guide about getting started with Google Analytics.
Step 13: Start Making Money with Your Travel blog
Before you even start to think about monetizing your travel blog, you have to make sure that you are getting enough traffic. You would know the number of your monthly unique visitors from Google Analytics.
So, here is the fact: the more traffic your travel blog receives, the more money you can make with it.
But it is also important to know that getting much traffic will take time, so making money should not be you first goal.
However, once you are happy with your traffic amount, you can consider starting with these options:
Google Adsense:

It is a free service offered by Google for publishers (like: blogs, news websites, YouTube channels) to monetize their online content.
After you sign up for an account, you will need to enter some information. Then you will get codes for different-sized ads. You just have to place those codes in your website in where you think they will get better (more) clicks.
If you don’t know how to place the codes, download “Quick Adsense” plugin. It will help you placing the ad codes anywhere on your website easily.
Affiliate Programs:
Affiliates programs is part of affiliate marketing.
They are arrangements in which an online merchant website pays affiliate websites (or influencers) a commission to sell their products/services.
There are affiliates for many services like accommodation, insurance, web hosting. Or for products, like travel gear, books, electronics etc.
The affiliate website (or the influencer) gets a unique link called the “affiliate link”.
Every time a website visitor clicks on that link and purchase of an affiliate’s service/product, you earn a commission.
Sponsored posts and tips:
Sponsored posts work the best when you write about specific products to give your opinion about.
Just make sure to be real and transparent. Speak about pros and cons.
Once you are more and more known and people trust your opinion, you can contact brands you like and get paid for your work.
Sponsored trips happen when private travel companies or tourism-related websites ask you to promote their services. You might then visit them and write about that.
By following the above-mentioned steps, you will be surely able to start travel blogging.
If you have the passion, please don’t let anything scare you.
If you have any questions, share them with us in comments below. We do read and reply to EVERY comment. ??
2 Comments